
back to sheet metal parts for sale
Some tips on how to make OEM/NOS body panels last the life of the car
This is the procedure I did on my BC already described in my step by step restoration article. Car today does not show even the colour of rust!
Fig 1-25 
Fig 1- 25. No such thing as overkill when it comes to rust protection! All the new sheet metal were afforded a high level of careful preparation. The two front fenders, front lower valance panel, two rocker panels and the two complete rear quarter panels were all coated in behind with epoxy primer and sealed before being welded to my car. Along the edges you see the silver “weld-through” coating described earlier. What you dont see are the NOS doors, those were sealed once on the car.
Fig 1-26a 
Fig 1-26b
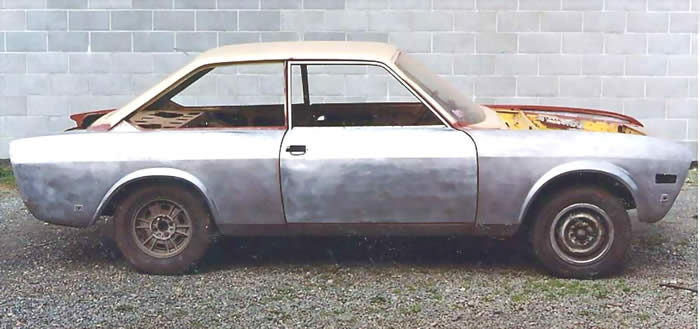
Fig 1-26c

Fig 1- 26. a, b and c. The car is at a good point of the restoration now, both sides are straight and aligned. The lower front valance and front fenders attached and nicely aligned. Assuming you are fortunate enough to find OEM NOS body panels, they may well have primer but it would be inadequate at best. More than likely, they’ll have some surface rust. Keep in mind that OEM NOS sheet metal parts for the Coupe will have been sitting around for at least 35 years. Through time and even the mildest humidity in the air, surface rust will eventually manifest itself, a testament to the poor quality primers of the day. The simplest the best thing to do is to remove all the primer and bring the panel down to bare metal, as I have done.
Following these steps will guarantee long lasting rust free metal.
1 Use a metal conditioner to clean the entire bare metal surface so the (etching primer) will properly adhere to the metal.
2 Spay a thin coat of etching primer. Do not sand.
3 When the etching primer has flashed (dried), spray immediately with a couple of coats of two part epoxy primer. This will finally seal and protect your panels’ external surfaces.
4 Now, you can spray any two-part catalyzed 2k acrylic primer, used in the prepping and painting stage. By the way, since you’ve gone this far on your restoration, don’t economize on sealers and primers. ALWAYS use top quality products.
Fig 1-27a

Fig 1-27b

Fig 1-27c

Fig 1-27d

Fig 1- 27 a,b,c and d. At this stage after I did the bare metal conditioner treatment, I applied a coat of etching primer, then a couple of coats of two part epoxy primer, then I applied 4 coats of two-part catalyzed 2k acrylic primer. Block sanded the entire car with dry paper only. While I was sanding out the waves I would stop as soon as I would hit/see red. I did not want to sand too deep and touch bar metal. If you look carefully at the pictures you see many red spots, that is the epoxy primer. I did not want to go past this point, remember this primer was very important to seal the out side moister and protect the NEW metal.